Summary
This WordPress setup cheatsheet is a quick-start guide for beginners and developers. It covers system requirements, server setup, installation via WP-CLI or manually, and configuring existing projects from Git or packages. Learn to manage media, organize folders, apply .htaccess rules, and troubleshoot common issues for a faster, smoother WordPress setup.
If you’re new to WordPress or just want a handy reference guide, you’re in the right place. WordPress is one of the easiest ways to build and manage a website, but there’s still a lot to learn. This cheatsheet will walk you through everything from installation to theme building, plugins, admin settings, and performance tips. Whether you’re a blogger or a developer, this guide will help you build better, faster, and smarter with WordPress. This guide walks you through everything you need to know:
Table Of Contents:
1. Before Installing WordPress – What You Need
| Requirement | Recommended Value |
|---|---|
| PHP Version | 8.x |
| MySQL / MariaDB | MySQL 8.0+ / MariaDB 11.8+ |
| Web Server | Apache or NGINX |
| Local Server Tool | XAMPP, MAMP, LocalWP |
| Text Editor | VS Code, Sublime Text, etc… |
2. How to Install WordPress
You can install WordPress in two main ways:
1. WordPress Installation Using WP-CLI (Terminal Method)
Step 1. Create Project Directory :
Navigate to your local server directory:
- For XAMPP, go to htdocs/
- For MAMP, go to Sites/
Then, open your terminal and run the following commands:
mkdir my-wp-sitecd my-wp-site
Step 2. Download WordPress Core
wp core downloadNote : This will download the latest WordPress into your current directory.
# Download specific version
wp core download --version=6.7
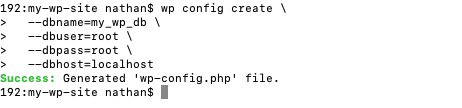
Step 3. Create a Database
mysql -u root -p -e "CREATE DATABASE my_wp_db;"Step 4. Generate wp-config.php
wp config create \
  --dbname=my_wp_db \
  --dbuser=root \
  --dbpass= \
  --dbhost=localhost
Replace :
- my_wp_db → your database name
- root / password → your DB username/password
- localhost → DB host (use 127.0.0.1 or container name in Docker)
Step 5. Run Final Installation and Create Admin User
Before this step:
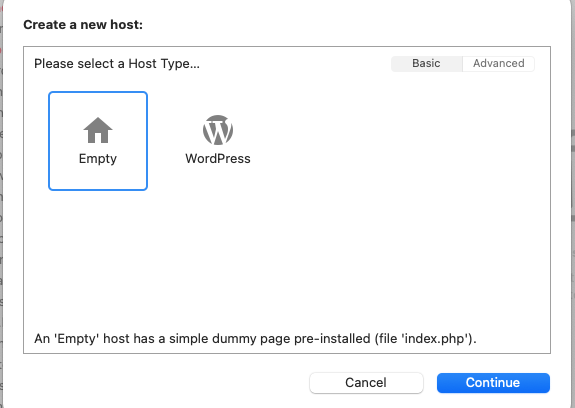
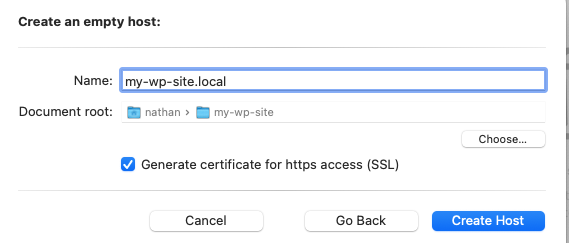
- If you already created a local domain in the MAMP/XAMPP hosts file (like my-wp-site.local), use it here.
- Or, create a new host in MAMP/XAMPP (like my-wp-site.local) and point it to your project directory (my-wp-site).
Now, install WordPress:
wp core install \
  --url="https://my-wp-site.local/" \
  --title="My WP Site" \
  --admin_user=admin \
  --admin_password=admin123 \
  --admin_email=you@example.com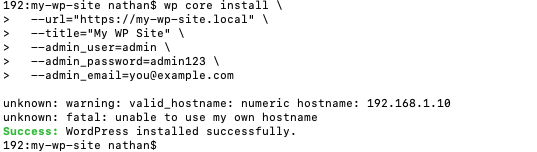
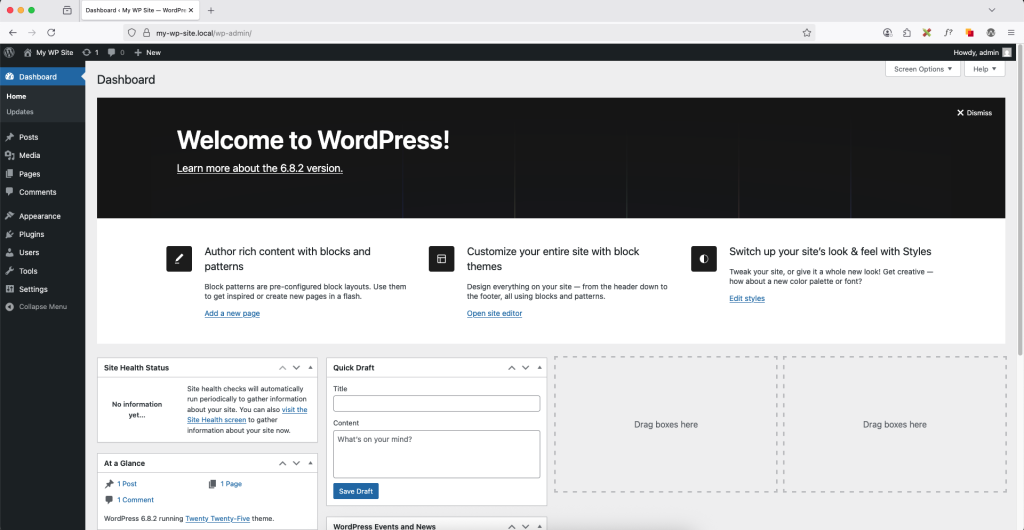
Step 6. Access Your Site
Open your browser and go to:
- https://my-wp-site.local
- Log in with the admin credentials you created in Step 5.
2. WordPress Installation (Non-WP-CLI Version)
Step 1. Download WordPress – https://wordpress.org/download
Step 2. Extract WordPress Folder
- Place it in htdocs/ (for XAMPP) or Sites/ (for MAMP)
- Rename folder as your project (e.g., my-wp-site)
Step 3. Create a Database in phpMyAdmin
- Open https://localhost/phpmyadmin
- Create new DB (e.g., my_db_name)
Step 4. Configure wp-config.php file
- Rename wp-config-sample.php to wp-config.php
- Update DB credentials:
define('DB_NAME', 'my_db_name');
define('DB_USER', 'root');
define('DB_PASSWORD', '');
define('DB_HOST', 'localhost');
Step 5. Run WordPress Setup in Browser
- Visit https://my-wp-site.local
3. Existing Project Setup (Cloning or Manual Setup)
Depending on how the project is provided:
- If Using Git
- Clone the project using the command:
git clone <repository-url>- After cloning, continue from Step 2 of the WordPress Installation (Non-WP-CLI Version) section to complete the setup.
- Manual setup
- Extract the project folder (e.g., from a .zip file) into your local server directory (like htdocs/ for XAMPP or Sites/ for MAMP).
- Then follow Step 2 of the WordPress Installation (Non-WP-CLI Version) section to configure your database and run the setup.
4. Media Upload Configuration
- Directly apply the media folder in the project directory:
- If cloning or downloading the project:
1. Directly apply the media folder in the project directory:
Navigate to your project directory and place the uploads folder inside the following path:
/wp-content/uploads/
2. If cloning or downloading the project:
- Create an uploads folder inside the wp-content directory.
- Inside the uploads folder, create a .htaccess file.
- Add the following code in the .htaccess file:
<IfModule mod_rewrite.c>
   RewriteEngine On
   RewriteCond %{REQUEST_FILENAME} !-d
   RewriteCond %{REQUEST_FILENAME} !-f
   RewriteRule (.*) https://my-wp-site.com/wp-content/uploads/$1
</IfModule>
5. Common Issues & Fixes:
Issue : Permalink Issues – Blank Page or 404
If your site shows a blank screen or 404 errors when accessing posts/pages:
- Check if a .htaccess file exists in your project root directory.
- If not, create one and add the default WordPress rules:
- /your-project-folder/.htaccess
# BEGIN WordPress
<IfModule mod_rewrite.c>
RewriteEngine On
RewriteBase /
RewriteRule ^index\.php$ - [L]
RewriteCond %{REQUEST_FILENAME} !-f
RewriteCond %{REQUEST_FILENAME} !-d
RewriteRule . /index.php [L]
</IfModule>
# END WordPress
Final Thoughts
Whether you’re setting up a fresh WordPress site or working on an existing project, this cheatsheet covers all the core steps you need. Bookmark it for quick reference and keep building faster with WordPress!
This cheatsheet should make your WordPress journey much easier. If you need help setting up or customizing your WordPress site, feel free to contact us—we’re here to guide you.